Shoemaking School Pt. 9 — Boot Patterns
You’re getting a three for one special here. How to do a derby boot pattern, a bellows tongue technique, and how to make sidezip or Chelsea style boot patterns.
Derby boot patterns are are very similar to derby shoes, so you can reference Pt. 7 of this series if there is any confusion. I’m going to skip some steps because they can be found in that guide as well.
First part is to tape off the last. Make your markings on the last similar to the derby pattern, draw a line across through the widest point of the shoe (shifted up 5mm). Mark the center of that line, that will be where your facing seam is located. You could theoretically draw all of this out later in the pattern base, but I like to do it on the last because its easier to get a feel for how the final product will look. Also make sure to mark your heel height, B, its used to determine how to shape the shaft at the back. Rule of thumb for this, size 42 is 6 cm, +1mm for each size up, if it ends on a half size, round up
Next, peel the tape off, and transfer it to a piece of paper. Notice I made a small relief cut to help flatten the tape. Cut around the tape for now.
This is where things get interesting, below is the reference material I am going off of. I don't actually use this measurement chart by the way, just giving here for additional resources. I also don’t have any boot lasts (the second page) so I will only explain how to make a boot pattern with a shoe last. This stuff took me quite a bit of trial and error to decipher, but once you get the hang of it it’s not too bad.

Fold your paper over so that the point hits the midpoint of the last. Notice the notches, I add those so it’s easier to transfer to paper later on. Mark where the paper folds (at the front of the last).
At this stage, I also cut out along the lines I added earlier, again, so it will be easier to transfer all of this on to the actual pattern base. This whole exercise was to find the K point. As with the derby pattern, I don’t actually know why some of this stuff is the way it is, but it works!
Here is the reference I use to make the pattern base of the boot last.
Now transfer that to another piece of paper, and you’re ready to go on a pattern base. Mark the C.P. point 5mm below point B. Take a 90 degree ruler and line it up along the widest point of the last, and C.P. Also draw a line from the base of the heel through K.
This is where you get to choose the height of your boot. Whatever you pick, extend the vertical line to that height. Draw a perpendicular line across the boot. Mark along that horizontal line how wide you want the boots. I noticed around 12–13 cm is a good width for sizes 10–11 US, the first pair of boots I made, it was almost 14 cm and way too wide for my calves.
Make a vertical line 1.3 cm up from your width point, move .5mm in from the vertical line you drew for the back of the boot and connect it to the 1.3cm line, that's going to be the topline for your boots.
Extend the K line about 3 mm, and connect your topline down to the facing of the shoe. You can determine how wide open your facing is at this stage, I like to keep mine fairly tight, maybe about 1 cm open. If you want it wider, lower that facing line away from the edge of the last outline.
At this stage, add the lasting allowance (2.3–2.5 cm), a bit of space to account for the heel counter (2–3 mm), and make sure you’re accounting for the slight asymmetry of the last by making the inner facing slightly higher than the outer one. If you want to do any stitch marks, or heel counter or anything like that, you can add it to the pattern here.
I added a heel counter some lacing holes, and marked where my lining is going to be. At this stage, if you want a normal tongue, just extend the C line and add a tongue (reference the Derby pattern guide for more details).
Here is the complete pattern base. I make my cuts straight along the lines, and wavy around it, so that I can tell which side to trace along. I also go ahead and punch out the eyelets with the exact size they’re going to end up being. That way I can measure it all out exactly and not eyeball it later, which leads to misaligned eyelets.

At this stage, its the same story as the derby boots. Draw a center line, flip the pattern base along the center to get your pattern.

One thing to note, you have to have two separate pieces for the lining. To account for the curve along the heel. My first pattern I tried to do it the same way as I do shoes, where you just flip it along the centerline and make it one piece. I ended up with a lot of bunched up leather along the back. Make sure you add your 5mm extra along the top, its easier to line it up that way and you can trim it off later. I also take quite a bit in on the heel, otherwise you’ll have a lot of excess material back there. Don’t worry about it being too narrow, lining leather should be stretchy, it will work out.
I have a slightly funky heel counter here. If you go with anything that’s not completely straight, Flip it along the center line, making sure you keep the width and general shape of it.
And here are the completed pattern pieces for reference. Notice how I have a slight outline inside, along the heel counter. I ended up sketching about 2mm extra room for the entire thing, because I’ll add pinking to it. Also, for the underlay along the captoe, I used 11mm instead of 9mm, because I’ll add some brogueing to the cap toe.
Don’t forget to put your little V cut to mark which is the inner side.
Now for the bellows tongue. You’re essentially making a W, with the width of it being however wide you made your facing. Measure the vamp to confirm.
Next stage. I’m kinda making it up as I go along here, this is only the second bellows tongue I’ve ever done.
And here it is. I made it on paper first instead of the poster board I use for my patterns
And here’s why, so I can test it out! It lines up all right, however I’ve determined that the length is a bit short by comparing it to my pattern pieces.
I added the slits in, and this is how it’s going to connect on the actual uppers. The cut piece will go under the vamps, and be sandwiched by the lining.
Here’s the full pattern, with the tongue extended by 1.5cm.
Now for a side zip version. Do all the steps outlined above to make your pattern base. By the way, that first stage where you transfer the tape to the piece of paper and fold it over to find K? Well, if you save that, you don’t ever really have to do that again. You can make all your boot patterns for this last off of that. In fact, you can just reuse the old pattern base, transfer the outline to a piece of paper, and adjust whatever you want afterwards. So, pretend you did that here, but now you want to turn it into a side zip, or a Chelsea boot.
Boom, now you have a side zip boot. Super easy, mark out where you want your zipper, and how you want your panels to lay out. I have a one piece vamp here, that I will have to crimp later. Making a Chelsea boot would use the same exact technique, but you’d add a space for the elastic instead of the zipper.
Here are the outer quarters, and the heel counter. I ended up reusing the upper pattern to make the lining. I’ll just make it slightly smaller whenever I connect the lining pieces together.
Here are the inner pieces with the zipper. This is actually the second pair of boots I’m making with this pattern, I decided to make a much more narrow zipper opening on this one, hence the discrepancy between the pattern and the cut out upper.
And here is the vamp pattern, along with two examples of crimp boards. I made the wooden crimp board to account for the curve of this pattern. Although, I made the prior pair of boots on the top crimp board. At first I thought the throat of the shoe was a little bit tight, which is why I made the second crimp board. However, they’ve stretched out and are perfect now so maybe I didn’t need it.
Here the pattern I made for the vamps before they are crimped. I sort of eyeballed this, then added more space just in case. Good thing, because I barely had enough length crosswise to get it on the cinching bolt on the crimp board.
Here are the uppers, crimped. Basics of crimping, soak the leather for a while, center it on the board, and basically last it. The cinching bolt (laying on top of the pliers) helps pull it in diagonally.
Once it’s dried and has taken on the shape, take them off, and cut out the vamps. I had to re-dye the vamps, since some of the dye leached out while they were soaking before being crimped. Its a horsebutt from Maryam, with part of the shell cordovan in the vamps.
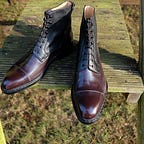
And some finished shots of the original pair of side zips I made..
And after a few weeks of pretty heavy wear. The beauty of this leather is that you can apply some conditioner, most of the scuffs will disappear, or you can leave it for a more worn look. It also burnishes really well for some great patina action, you can see some starting to develop along the front. Its a heavily waxed nubuck Kudu from CF Stead, a tannery in the UK. Its one of my favorite leathers of all time, besides the patina potential, its quite thick and dense, but still maintains its softness and flexibility.
Originally posted on my website, arnoshoes.com
To see my current projects, give my Instagram page a follow