Shoemaking School Pt. 8 — Derby Upper Assembly
Now that you got your uppers made, time to put them together!
First stage is to get everything skived. I have a bell skiver, which really helps especially if you make a lot of shoes, but a simple skiving knife will do the trick. My go to knives are the Tina 270, and 230 (my favorite).
When skiving, the general rule of thumb is anything that’s going to be under lay (the piece of leather going under a seam), it should be skived down all the way to zero. Overlay (whats going on top) should be skived about 50%, but that’s more of a personal preference how far you skive. The whole point of skiving things down is so you don’t see the transition between the two pieces of leather, and so it doesn’t get too thick at the seams.
Here the you see the heel counter on the lining underlay skived down completely. I didn’t have my usual skiving surface so I used a glass plate. Important that you have something hard and smooth, so it doesn’t damage your edge.
Lining quarters, both skived 50% here.
Lining vamp, skived down to zero
Upper vamp, skived down to zero, with the area that the tongue connects to skived about 50%.
Quarters, topline and the front seam area is skived 50%, the underlay under the heel counter is skived to zero.
I skive the outside edge of the tongue down to 50% as well. You don’t want it too thick and stiff pressing up against your foot.
Now that skiving is done, time to start gluing everything up! I use Topbond contact cement. I used to use Barge, but that glue loses its strength quick after you start adding thinner.
At this stage, I start sewing all of those pieces together. For beefier boot type footwear, I use size 69 bonded nylon thread. For shoes like this, I used size 46 bonded nylon thread and size 12 needles with an R point.
Try to keep the stitch as close to the edge as you can for a more refined look. This part is always a bit scary, nothing quite like ruining a beautiful pair of shoes with janky stitching. I find that not looking at the needle helps, I keep an eye on the wheel and try to keep where the wheel is going consistent with the edge of the leather.
Stitching “the butt” on the lining, you want the stitch on the outside.
For the upper, you want it on the inside
And here is why I call it the butt. All stitched up.
Neat trick that you should do with all of your stitching, is hammer it! It will set the thread and close the leather around it. Generally, it looks much neater after it is hammered. Specifically for the butt, hammer it like this on a chair or something you can wrap it around.
Mostly, so that the seam sits very flat, this will help later when you’re lasting.
After the tongue is stitched on, I glue the lining to the vamps, and do a stitch around the edge of the tongue. Afterwards, I cut away the excess lining. You definitely want to cut after you stitch, because sometimes the stitching will get wonky that close to the edge and not go through the lining straight. Use a very sharp knife while trimming, and try to angle it so that you don’t catch the stitches.
This is topline tape from Ideal Tape. Its Nylon and the topline stitch goes through it, its reinforcement so that the leg opening of the shoe doesn’t stretch out.
Time to make some piping! I use Shrut & Asch glazed kidskin, there are a lot of color options available, and the finish doesn’t come off like some other kidskins. I cut strips about 1.5 cm width, and skive it down. If you want bigger piping, skive it less, and vice versa.
Piping glued and ready to be added to the topline
Put some glue on the edges of the topline, and the piping. This is how I get it down, make sure to keep it all even! If you’re a super cool guy, you can cut out little V’s around the edges where it folds in. You definitely have to cut relief incisions where it folds out.
Piping in, the relief incisions are visible here. Hammer it down, skive and lumps and you’re good to go.
I just make an even cut on the edge.
When lining (heh) up the lining and the upper, make sure the butts align. I also leave a mark on the top of the heel counter where the center should be.
I mark out where the lining will sit, it’s much easier to do it beforehand, then wrestling with it and trying to make sure its aligned when there is glue on.
Glue along the topline, and the whole area where the flaps are.
I cut out the V after I glue it, this is where your lining will connect. If you don’t cut deep enough, its okay, when you go to connect the lining later you can always cut more.
Topling stitched, I trimmed the extra lining off the flaps, and a bit on the heel so I can line it up to the correct heel height on the last. When I’m lasting the shoe, I will nail through that extra lining, to keep the uppers from getting misaligned when I’m pulling things tight.
Glue and stitch the quarters and vamps together, making sure not to stitch through the lining!
Here’s what that looks like on the inside, I forgot to add a pic of the reinforcement tape I added at the edges by the tongue.
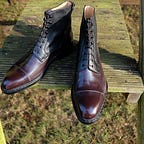
Everything is stitched and ready to go!
The final stage is adding the eyelets and some reinforcement stitching. I do a hand stitch, but you could come back in and do some extra stitching on the corner where the vamps connect to the quarters, stitching through everything including the lining.
Also posted on my website, www.arnoshoes.com
If you want to see my latest projects, give my Instagram page a follow