Shoemaking School Pt. 10 — Norvegese Construction
Norvegese is just Italian for Norwegian, this is a construction method that is known for the distinctive chain stitch, which is both decorative and provides additional waterproofing to the shoe. The construction is a bit different because it doesn’t use a welt, instead the upper is attached directly to the insole, then turned out and used in place of a welt. There are several techniques to do it, but the base process is the same.
The foundation of any shoe is the insole, start by trimming the insole. For Norvegese, it must be a perpendicular to the last, with a slight angle in along the waist, and a more distinct angle around the heel (at least for 270 degree stitch).
Once the insole is properly trimmed, mark out your heel. I use heel width + 5mm for heel length. Next trace out your holdfast as pictured above, about 6–7mm width. A Norvegese holdfast will be flush with the edge of the insole, instead of inside a bit like for a handwelt.
Next, I make an incision about 2–3 mm deep along the holdfast. Make sure to cut from the outside in at a slight angle (as shown above), that way you’re making the holdfast a bit thicker.
Next I use a feathering knife to cut out the channel for the holdfast, you can also use a normal shoemaker’s knife but its a lot more work.
Here is what a finished holdfast looks like.
I rounded out the edges along the heel, so you have a nice smooth transition to the midsole there instead of a square heel.
At this point, proceed to last your shoe like normal. The only difference, and its crucial, make sure to use paste instead of contact cement when you secure the upper. Less is more, I use Elmer’s glue slightly diluted, that way you can peel it back later.

At this point, make an awl hole in that corner by the heel and mark where your awl comes out. Since you’ll be stitching from the outside in, you need to mark out all of your stitching beforehand to make sure its even.

I do the same thing a few times throughout the shoe, it’s better not to pierce the upper, just mark with a silver pen where you see it bulge from the awl. If you pierce it, your awl holes may not align perfectly later.

Next, I trace out a stitching line with a silver pen, using the marks I made earlier as a guide. It takes a bit of practice, but you can use your fingers along the bottom of the shoe as a guide to make sure your line is even. Next, mark out your awl holes with a compass. You can use 5–7mm spacing, depending on preference and how thick you make your thread. I use 5–6 threads of 225g Ramie thread, twisted and treated with shoemaker’s wax. It’s a design choice at this point, thicker or thinner thread can change the look of the shoe. For the actual thread going through the insole, its not a huge deal if its too short. You can just tie it off and start the new thread in that hole. If you make your chain stitch thread too short, you’ll have an ugly transition, so make sure you measure accurately. It should be about 2.5x the length of the stitch length around the shoe.

This picture is just to show that you should be poking your awl from the outside in. It takes some practice to aim this way, try and hit the base of the channel to give the stitch the most strength.

The first loop, the chain stitch is just pulled through it at this point.

The chain stitch in a nutshell, at each stitch, loop the chain stitch around it. I loop the top thread in first, then the bottom over it. I’m pretty sure the order doesn’t matter, as long as you’re consistent.

After you get the chain stitch set, tighten the insole stitch snug but not too tight. At that stage, I adjust and tighten the chain stitch, then cinch down the insole stitch. You’re aiming for consistency in tension of the chain stitch, if it’s tight in areas and loose in others the overall look will be sloppy.

Now that we’ve gotten to the other side, what to do with the excess thread?

Easy, just trim it as neatly as you can.

Here is where a heel pry comes in handy, and hopefully you didn’t use too much glue as you’ll have to pry up the upper at this point.

Putting it some nails, then folding them out really helps to clear your working area.

Glue back the piece you cut out for your holdfast, put in a shank, and even some of the gaps out at this point. I use leather scraps. I also put in a thin layer of cork at the front and a shank cover in the back.

A midsole is essential for this construction method, in this case I decided to go with a super beefy one.

For this pair of shoes, I stitched directly through the turned out upper, midsole, and outsole. There are several ways you can go about making a Norvegese shoe though.
Here is a much thinner midsole being used, I also didn’t do a chain stitch here. I added another stitch under the insole stitch to attach the upper to the midsole, then trimmed off the remainder of the upper. After this step, I attached an outsole and added a stitch holding the midsole and outsole together.
An example of a chain stitch with an outsole stitch through the midsole. Notice the stitch holding the upper to the midsole directly under the chain stitch.
Finished product without a chain stitch. It’s really just design choices at this point.
And here is an example of a very thin chain stitch, using alternating colors. I really like this look, my one gripe with Norvegese is how wide it makes the edges of the shoe, which in turn makes a much wider heel. A thin stitch helps mitigate that.
If you want to do a fiddleback waist with a Norvegese stitch, here is how the insoles would look for that. Basically, Norvegese holdfast around the front of the shoe, but take it to a normal handwelt holdfast at the waist.
Stitch the front like normal
And transition to a handwelt at the waist. You can stitch the heel seat as well, or use the welt as a rand and just nail it in (assuming you have a metal plate at the heel of your last).
Here is how you do the transition between the welt and the turned out upper. At this stage, you can follow my guide on how to do a fiddleback waist.
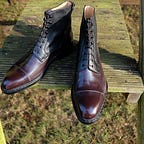
The end result, one of the coolest pairs I’ve made so far.
To see other articles and my body of work, check out arnoshoes.com
To keep up with my current projects, give my Instagram page a follow